

Flaky Mini Pumpkin Hand Pies with Jack-O’-Lantern Faces
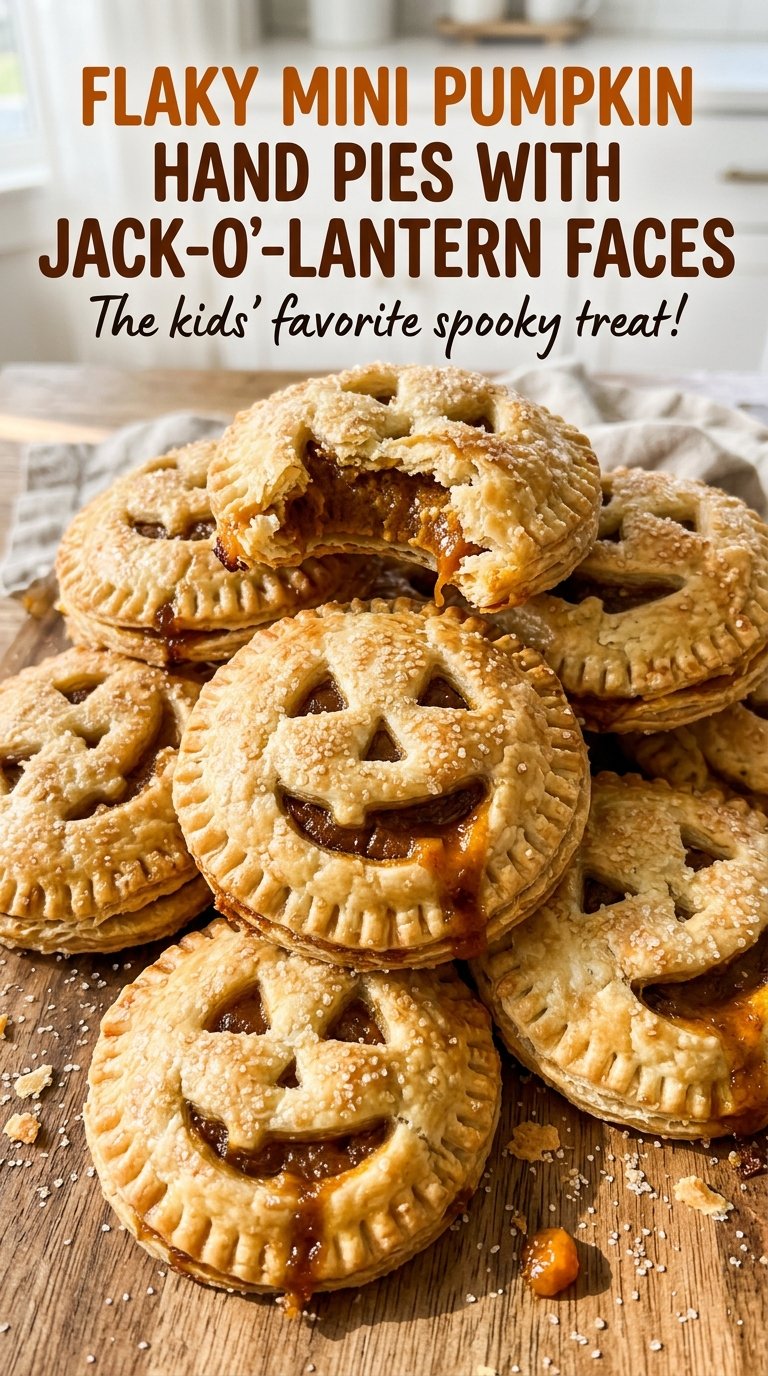
The little faces are the first thing I look at when these pies come out of the oven. If pumpkin filling is bubbling through the eyes and mouth, I know…
Tip: save now, read later.
The little faces are the first thing I look at when these pies come out of the oven. If pumpkin filling is bubbling through the eyes and mouth, I know the centers are hot and the pastry is nearly there. These flaky mini pumpkin hand pies bring that jack-o’-lantern detail to a buttery, crisp crust, with a compact filling that stays inside instead of running across the pan.
The filling starts with canned pumpkin puree, brown sugar, pumpkin pie spice, and cornstarch. That last ingredient thickens the pumpkin as the pies bake, which matters when each pastry has openings cut into the top. For the crust, cold butter stays in little pieces instead of disappearing into the flour; those bits are what give the baked pastry its flaky layers. The pies come together with a fork-crimped edge and a shiny egg wash, then bake until golden, with orange filling peeking through the faces.

Kitchen Note
Give the assembled pies their full 15 minutes in the refrigerator on the baking sheet. That final chill firms the pastry before it goes into the hot oven, so the little cutout edges are less likely to lose their shape.
Save these flaky mini pumpkin hand pies with jack-o’-lantern faces for a fall baking day—the crisp pastry and bubbling pumpkin centers make every little pie feel special.
Why the Jack-O’-Lantern Cutouts Are a Useful Baking Cue
The little openings do more than make these hand pies look festive. They let you see what the filling is doing while the pastry bakes: when pumpkin bubbles up through the eyes or mouth, the filling is hot and the cornstarch has had a chance to thicken it. That visible cue is especially helpful because the tops cover most of the filling, so you can’t judge the center by looking at the pastry alone.
Cut the features into the top rounds before you place them over the filled bottoms. It’s easier to work with a flat round than to cut through a sealed pie, and the knife stays away from the filling. Keep the openings recognizable but not so large that they take over the top; eyes, a nose, and a mouth give you plenty of room to see the bubbling center. The shapes don’t need to match from pie to pie. A small difference in each face is part of their charm.
These openings also give escaping steam a route out as the filling heats. That helps the top stay in place rather than puffing up around a sealed pocket. The faces are both decoration and a quick read on what’s happening inside.
What Keeps the Pumpkin Filling Thick and the Pastry Flaky
- Canned pumpkin puree — Choose plain puree, not pumpkin pie filling, which is already sweetened and spiced. Canned puree gives this small batch a consistent texture; homemade puree can carry more water and make a loose filling.
- Cornstarch — It thickens the pumpkin mixture as it bakes, helping it stay in the pastry instead of turning runny. Whisk or stir it thoroughly into the filling so you don’t end up with dry pockets.
- Cold unsalted butter — The butter’s small, firm pieces create the flaky texture. Use butter straight from the refrigerator and cut it into cubes before mixing. Unsalted butter also keeps the pastry’s salt level predictable; salted butter would change that balance.
- All-purpose flour — It gives the dough enough structure to roll, cut, and crimp without overwhelming the buttery layers. A regular store-brand flour works well here; measure it without packing it into the cup.
- Ice water — Cold water brings the dough together while helping the butter stay firm. Add it gradually and stop once the mixture starts clumping; a smooth, wet dough isn’t the goal.
- Brown sugar and pumpkin pie spice — Packed light brown sugar gives the filling gentle molasses notes, while the spice supplies the familiar warm seasoning without extra ingredients. Stir until the pumpkin mixture looks even.
- Egg and water — Whisked together, they brush onto the borders to help seal the pies and over the tops to encourage an even golden finish. Brush lightly so the egg wash doesn’t pool in the cutouts.
From Cold Dough to Golden, Crimped Pumpkin Pies
Bring the pastry together without warming it
Whisk the flour, sugar, and salt in a large bowl, then cut in the cold butter with a pastry blender or your fingertips until pea-size pieces remain. Sprinkle in the ice water and toss until the dough begins to clump, adding more only as needed. If it still looks sandy, give it a few tosses before adding more water; it should hold when pressed, not feel wet or sticky. Divide the dough into two disks, wrap them, and refrigerate for at least an hour.
Stir a smooth, concentrated pumpkin filling
Mix the pumpkin puree with the brown sugar, cornstarch, pumpkin pie spice, and salt in a small bowl. Stir until no streaks of cornstarch remain and the mixture looks uniform. The filling should be thick enough to mound on a spoon rather than pour like a sauce. Set it aside while you prepare the oven and pastry.
Roll and cut the rounds before filling
Heat the oven to 400°F and line an 18×13-inch rimmed baking sheet with parchment paper. Roll each dough disk between sheets of parchment until it is 1/8 inch thick, then cut eight 3 1/2-inch rounds from each disk. Reroll the scraps once to cut any remaining rounds. Arrange eight rounds on the lined pan, then use a small knife to cut eyes, noses, and mouths into the other eight.
Seal the filling inside the face tops
Whisk the egg with the water for the wash. Divide the pumpkin filling over the rounds on the pan, leaving a 1/2-inch border around each one. Brush the borders with egg wash, set the face-cut rounds on top, press the edges together, and crimp all the way around with a fork. Brush the tops with egg wash, taking care not to let it collect in the openings.
Bake until golden and let the pastry settle
After the assembled pies have had their refrigerator rest, bake them at 400°F for 18 to 22 minutes. Look for golden pastry and pumpkin filling bubbling through the face cutouts; the exact minute can vary slightly with your oven. Let the pies cool on the baking sheet for 10 minutes before serving. The filling is hot when it comes out, and that short wait also gives the pastry time to firm up.
Two Ways to Change the Look Without Changing the Filling
Give each jack-o’-lantern its own expression
Keep the same dough and pumpkin filling, but vary the eye shapes and mouth on each top round. Simple cutouts are easiest to seal and leave a clear window for the filling; finer details take a steadier hand and can be harder to see once the pastry puffs.
Make a classic closed-top hand pie
For a plain top, leave the top rounds uncut and assemble the pies with the same filling, egg wash, and fork-crimped edges. You’ll lose the jack-o’-lantern look and the bubbling-through visual cue, but the pumpkin stays fully covered by pastry.
Storage and Reheating
- Refrigerator: Refrigerate cooled pies in a covered container within 2 hours; they keep for 3 to 4 days. The pastry softens slightly in the refrigerator.
- Freezer: Freeze fully cooled pies in a single layer, then transfer them to an airtight freezer container. They keep well for about 2 months, though the pastry is crispest when freshly baked.
- Reheating: Warm them in a 400°F oven until heated through. Avoid the microwave if you want to keep the pastry crisp; it tends to make the crust soft.
Questions I Get About These Pumpkin Hand Pies
Flaky Mini Pumpkin Hand Pies with Jack-O'-Lantern Faces
Ingredients
Equipment
Method
- Whisk the flour, sugar, and salt in a large bowl.
- Cut in the butter with a pastry blender or your fingertips until pea-size pieces remain.
- Sprinkle 6 tablespoons ice water over the mixture and toss until the dough begins to clump, adding up to 2 tablespoons more as needed.
- Divide the dough into two disks, wrap, and refrigerate for at least 1 hour.
- Stir together the pumpkin puree, brown sugar, cornstarch, pumpkin pie spice, and salt in a small bowl until smooth.
- Heat the oven to 400°F.
- Line an 18x13-inch rimmed baking sheet with parchment paper.
- Whisk the egg and water in a small bowl.
- Roll each dough disk between sheets of parchment to 1/8-inch thickness.
- Cut eight 3 1/2-inch rounds from each disk, rerolling scraps once.
- Arrange eight rounds on the prepared baking sheet.
- Cut jack-o'-lantern eyes, noses, and mouths into the remaining eight rounds with a small knife.
- Divide the pumpkin filling among the rounds on the baking sheet, leaving a 1/2-inch border.
- Brush the borders with egg wash.
- Place the face-cut rounds on top, press the edges together, and crimp with a fork.
- Brush the tops with egg wash.
- Refrigerate the pies on the baking sheet for 15 minutes.
- Bake at 400°F for 18 to 22 minutes, until the pastry is golden and the filling bubbles through the face cutouts.
- Cool on the baking sheet for 10 minutes before serving.
