
Burnt Honey Medovik
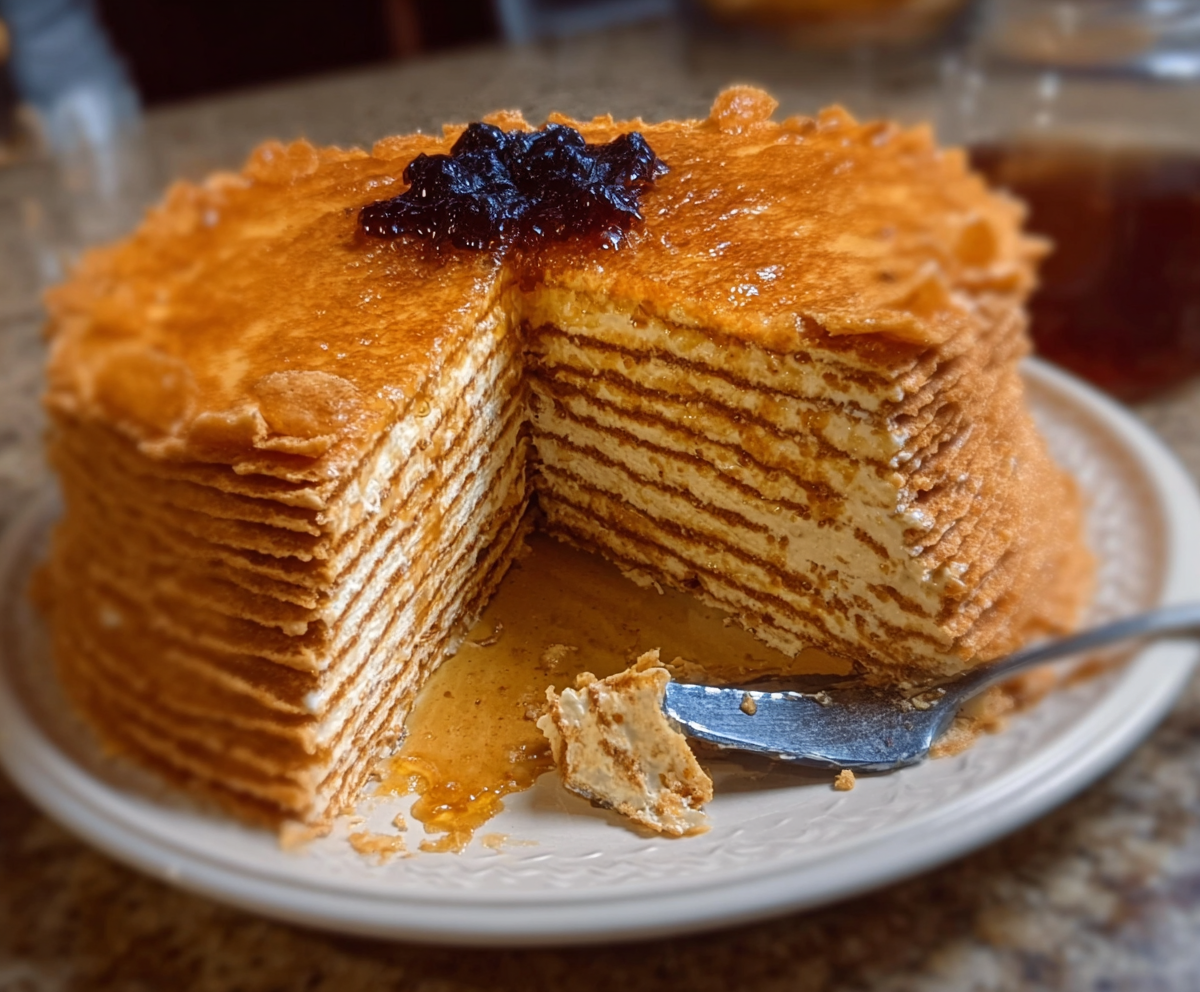
Burnt Honey Medovik is a delightful twist on the classic Russian honey cake, known for its layers of thin, tender cake and creamy filling. The burnt honey adds a deep,…
By Emily
•
•
Reading time: 6 min
Tip: save now, read later.
Burnt Honey Medovik is a delightful twist on the classic Russian honey cake, known for its layers of thin, tender cake and creamy filling. The burnt honey adds a deep, rich flavor that gives it a unique smoky sweetness you won’t find in your usual desserts. Each bite is a perfect balance of soft cake and smooth, luscious cream with that subtle caramelized note from the burnt honey.
I love making this cake when I want to impress without spending all day in the kitchen. The burnt honey gives it such a special touch that people always ask what makes it so different. I find that slowly heating the honey to just the right color really brings out those rich flavors—and watching the transformation is a little bit of kitchen magic I always enjoy.
My favorite way to serve Burnt Honey Medovik is with a cup of hot tea or coffee, especially during the colder months when you want something comforting but not too heavy. It’s one of those desserts that feels festive enough for special occasions but simple enough to make for a cozy night in. Plus, leftovers (if there are any!) taste even better the next day once the flavors have had time to settle.
Key Ingredients & Substitutions
Honey: The star of the cake, burnt honey brings a deep caramel note. If regular honey isn’t available, a mild-tasting honey works, but you’ll miss that smoky depth.
Flour: All-purpose works best for layered cakes like this. For a lighter texture, try cake flour, though the dough may be a bit more delicate.
Sour Cream: Adds tang and richness to the cream. You can swap it for Greek yogurt or crème fraîche for a similar effect.
Heavy Cream: Use cold for better whipping volume. If you want a lighter filling, mix half heavy cream and half milk but the texture won’t be as thick.
How Do You Roll and Bake Thin Cake Layers Perfectly?
Rolling out very thin and even layers is key for the Medovik’s delicate texture. Here’s how I do it:
- Divide dough into equal pieces—10 to 12 is ideal for thin layers.
- Flour your surface lightly to prevent sticking but avoid too much to keep dough soft.
- Roll each piece gently to about 1.5–2 mm thickness, aiming for an even circle around 8 inches.
- Use a fork to prick the surface lightly; this keeps the layers flat during baking.
- Bake layers quickly at 350°F (175°C) for 3–5 minutes and watch carefully—they brown fast!
- Let each layer cool fully before assembling to avoid melting the cream.
With practice, rolling and baking thin layers becomes easier and helps your cake stay beautifully tender and stack evenly.
Equipment You’ll Need
- Heavy-bottomed saucepan – perfect for gently heating honey and sugar without burning them.
- Mixing bowls – you’ll need a few for the dough and for whipping the cream filling.
- Rolling pin – helps you roll the dough very thin for delicate cake layers.
- Parchment paper – keeps the layers from sticking to the baking sheet and makes cleanup easy.
- Baking sheets – flat and sturdy to bake the thin cake layers evenly.
- Electric mixer or hand whisk – to whip heavy cream to soft peaks smoothly.
- Sharp knife – for trimming the layers nicely and slicing the finished cake cleanly.
Flavor Variations & Add-Ins
- Add a pinch of cinnamon or nutmeg to the dough for a warm, spiced note that pairs well with honey.
- Mix chopped toasted walnuts or hazelnuts into the cream filling for crunch and extra flavor.
- Use a splash of lemon juice or zest in the cream to brighten the rich sweetness.
- Swap berry jam topping for caramel sauce to deepen the burnt honey’s caramel flavor.
Burnt Honey Medovik
Ingredients You’ll Need:
For the Burnt Honey Cake Layers:
- 1 cup (240g) honey
- 3/4 cup (150g) granulated sugar
- 3 eggs
- 1/2 cup (115g) unsalted butter, melted
- 3 1/2 cups (440g) all-purpose flour, sifted
- 2 tsp baking soda
For the Cream Filling:
- 2 cups (480ml) heavy cream, cold
- 1 cup (225g) sour cream
- 3/4 cup (90g) powdered sugar
- 1 tsp vanilla extract
For Assembly and Topping:
- Crumbled cake scraps (reserved from trimming layers)
- Optional: berry jam or honey drizzle for topping
How Much Time Will You Need?
This recipe takes about 45 minutes of active prep and baking time. After assembling the cake, you’ll need to refrigerate it for at least 6 hours or overnight to let the flavors meld and the layers soften.
Step-by-Step Instructions:
1. Prepare the Burnt Honey Base:
In a heavy-bottomed saucepan over medium heat, combine the honey and sugar. Stir continuously until the mixture turns a rich amber color but is not burnt (about 5-7 minutes). Remove from heat and let it cool slightly.
2. Make the Cake Dough:
In a large bowl, lightly beat the eggs. Slowly add the slightly cooled burnt honey mixture and melted butter, whisking to combine. Sprinkle baking soda over the mixture and stir well—it may fizz a bit. Gradually add the sifted flour, mixing until a soft yet sticky dough forms.
3. Divide and Roll Out Cake Layers:
Split the dough into 10-12 equal parts. On a lightly floured surface, roll each piece very thinly (about 1.5-2 mm) into roughly an 8-inch (20cm) round. Trim the edges if needed for uniform size. Prick each layer lightly with a fork to prevent puffing.
4. Bake the Layers:
Preheat oven to 350°F (175°C). Place each layer on a parchment-lined baking sheet and bake for 3-5 minutes or until lightly golden. Keep a close eye to avoid over-browning. Allow layers to cool completely.
5. Prepare the Cream Filling:
In a chilled bowl, whip the cold heavy cream until soft peaks form. Gently fold in sour cream, powdered sugar, and vanilla extract until smooth and thick.
6. Assemble the Cake:
On a serving plate, place one cake layer and spread a generous amount of cream filling on top. Repeat stacking and filling until all layers are assembled, finishing with a cream layer on top.
7. Add Crumb Topping:
Finely crumble the leftover trimmed cake pieces and gently press them onto the top and sides of the cake for decoration.
8. Optional Topping:
Drizzle berry jam or honey over the cake’s top, letting it cascade down the sides for an elegant touch.
9. Chill:
Refrigerate the cake for at least 6 hours or preferably overnight. This resting time lets the layers soften and the flavors meld beautifully.
10. Serve:
Slice carefully with a sharp knife and serve with tea or coffee. Enjoy the delicate layers and rich burnt honey aroma in every bite!
Can I Use Regular Honey Instead of Burnt Honey?
Yes, you can use regular honey if you prefer a milder flavor, but the unique smoky caramel notes come from carefully caramelizing the honey and sugar. To mimic burnt honey flavor, gently cook the honey and sugar until amber-colored as described in the recipe.
How Should I Store Leftover Burnt Honey Medovik?
Store leftovers in an airtight container in the refrigerator for up to 3-4 days. The flavors improve after chilling, but make sure to keep it well-covered to prevent the cake from drying out.
Can I Make the Cake Layers Ahead of Time?
Absolutely! You can bake the layers a day or two in advance. Store them wrapped in plastic wrap at room temperature or frozen for longer storage. Just let frozen layers thaw completely before assembling.
Is There a Substitute for Sour Cream in the Filling?
If you don’t have sour cream, use Greek yogurt or crème fraîche as a great substitute. Both add a similar tangy flavor and creamy texture to the filling.