
Crispy Canned Salmon Cakes
Golden, crisp-edged salmon cakes are one of those meals that feel far more put together than the pantry ingredients behind them. The outside turns deeply browned and crunchy while the…
Tip: save now, read later.
Golden, crisp-edged salmon cakes are one of those meals that feel far more put together than the pantry ingredients behind them. The outside turns deeply browned and crunchy while the center stays tender and flaky, with lemon, herbs, and Dijon cutting through the richness so each bite tastes clean instead of heavy. They’re the kind of thing you can pull together on a weeknight without much planning, and they still land on the table looking intentional.
What makes these work is the balance of moisture and binders. Canned salmon can swing dry or watery depending on how well it was drained, so the eggs, mayo, and breadcrumbs have to work together without being overmixed. A short chill before frying also matters more than people think — it firms the patties just enough so they hit the pan in one piece and build that crust instead of falling apart.
Below, I’ve included the little details that keep canned salmon cakes crisp instead of soggy, plus a few smart swaps if you need to work with what’s already in your kitchen.
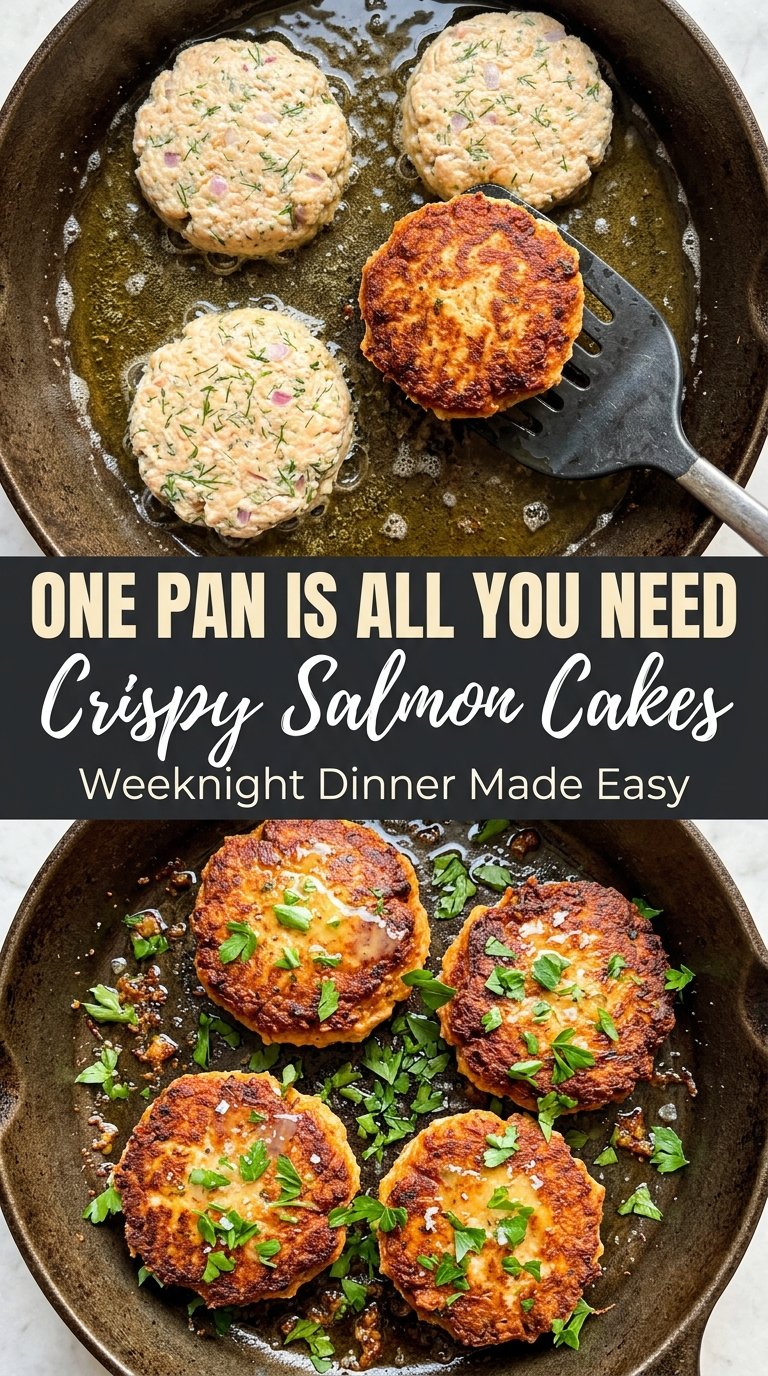
The patties held together perfectly after the 15-minute chill, and that lemon-Dijon flavor kept the salmon from tasting heavy. I also loved how the crust stayed crisp even after I plated them for a few minutes.
Crispy canned salmon cakes with lemon and dill are the kind of quick dinner worth saving for busy nights.
The Reason These Salmon Cakes Stay Crispy Instead of Falling Apart
The difference between a good salmon cake and a frustrating one usually comes down to moisture. Canned salmon needs to be drained well, but not squeezed into dryness, because the mixture still needs enough body to hold together once it hits the skillet. If the bowl looks loose or glossy, it’s not ready yet; a quick rest in the fridge lets the breadcrumbs absorb excess moisture and gives the patties a firmer structure.
The other trap is heat. Too low and the cakes soak up oil before they brown. Too high and the outside darkens before the center sets. Medium heat gives you that deep golden crust and keeps the interior tender instead of pasty.
- Drain the salmon thoroughly — excess liquid is the fastest way to end up with soft patties that won’t sear properly.
- Chill the shaped cakes — even 10 to 15 minutes makes them easier to flip and helps the crust develop cleanly.
- Use a gentle hand when mixing — overworking the mixture breaks up the flakes too much and makes the texture dense.
- Don’t crowd the pan — the salmon cakes need space so the oil stays hot and the crust stays crisp.
What Each Ingredient Is Actually Doing in These Salmon Cakes
- Pink salmon — canned salmon gives you the flaky base and enough natural moisture to stay tender. If you use a higher-end salmon, the cakes may taste richer, but pink salmon keeps the flavor balanced and budget-friendly. Drain it well and flake it into small pieces so the mixture binds evenly.
- Breadcrumbs — these absorb moisture and give the cakes structure. Panko makes the texture lighter, while fine breadcrumbs give a tighter, more compact cake. If the mixture feels loose, add a tablespoon at a time instead of dumping in a big handful.
- Mayonnaise and eggs — both add richness and help the patties hold together, but they do different jobs. Eggs set as they cook, while mayo keeps the inside moist. If you’re out of mayo, sour cream can work in a pinch, though the cakes will be a little less rich.
- Dijon, lemon, parsley, and green onions — these keep the salmon from tasting flat. Dijon sharpens the flavor, lemon brightens it, and the herbs bring freshness that canned fish needs. Fresh parsley matters here more than dried because it stays bright after frying.
- Smoked paprika and garlic powder — these season the cakes without making them taste heavy. Smoked paprika adds a subtle warmth that works especially well with the browned crust. If you want a cleaner flavor, use sweet paprika instead.
The 20 Minutes That Matter Most
Mix the Base Without Crushing the Fish
Start by draining the salmon well and removing any skin or bones you don’t want in the final texture. Flake it into a large bowl, then add the wet ingredients, seasonings, herbs, lemon, and breadcrumbs. Stir with a fork just until the mixture looks evenly combined. If you keep mixing after that point, the salmon turns paste-like and the cakes lose the loose, flaky bite that makes them good.
Shape, Chill, and Let the Mixture Set
Divide the mixture into equal portions and press them into patties about three-quarters of an inch thick. They should hold their shape without looking packed or compressed. Set them on a plate and chill them for 10 to 15 minutes. That short rest gives the breadcrumbs time to absorb moisture and keeps the patties from spreading when they hit the pan.
Fry Until the Crust Turns Deep Gold
Heat the oil in a skillet over medium heat until it shimmers. Add the cakes in a single layer and leave them alone for 3 to 4 minutes, because the crust needs uninterrupted contact with the pan to form. If you move them too soon, they’ll stick and tear. Flip carefully when the bottom is a deep golden brown, then cook the other side until the edges are crisp and the centers feel set when you gently press the top.
How to Adapt These Salmon Cakes for What You Have on Hand
Gluten-Free Salmon Cakes
Swap the breadcrumbs for gluten-free breadcrumbs or finely crushed gluten-free crackers. The cakes will still bind well, but the texture may be a little more delicate, so the chilling step matters even more.
Dairy-Free Sauce Option
Use dairy-free yogurt or skip the sauce and serve the cakes with lemon wedges and extra Dijon. The salmon cakes themselves are already dairy-free as written, so this swap keeps the whole plate simple without changing the main texture.
Baked Instead of Pan-Fried
Bake the patties on a parchment-lined sheet at 425°F until the tops are set and the edges begin to brown, flipping once halfway through if you want extra color. You’ll lose some of the skillet crunch, but you gain an easier hands-off method and less oil.
Using Fresh Herbs or Different Fish
Dill, chives, or cilantro can stand in for parsley if that’s what you have. If you’re using leftover cooked salmon instead of canned, chop it finely and reduce the breadcrumbs slightly because fresh-cooked fish usually holds less moisture.
Storage and Reheating
- Refrigerator: Store cooked salmon cakes in an airtight container for up to 3 days. They’ll soften a little as they sit, but the flavor stays good.
- Freezer: Freeze cooked cakes in a single layer, then transfer to a bag or container for up to 2 months. Reheat from frozen for best texture rather than thawing first.
- Reheating: Warm them in a skillet over medium-low heat or in a 375°F oven until heated through and the outside crisps back up. The biggest mistake is microwaving them, which turns the crust rubbery and the centers dry at the same time.
Answers to the Questions Worth Asking

Crispy Canned Salmon Cakes
Ingredients
Equipment
Method
- Drain the canned salmon thoroughly, removing any large bones and skin, then flake into a large bowl; smaller flakes bind better.
- Add the breadcrumbs, beaten eggs, mayonnaise, and Dijon mustard to the bowl.
- Stir in the parsley, green onions, garlic powder, smoked paprika, salt, and black pepper.
- Mix in the lemon juice and lemon zest, then gently combine with a fork until just combined—avoid overmixing so the cakes don’t turn dense.
- Check texture and adjust: if the mixture is too wet to shape, add 1–2 more tablespoons of breadcrumbs; if too dry, add a small spoonful of mayonnaise.
- Divide the mixture into 8 equal portions and shape into patties about 3/4 inch thick.
- Place patties on a plate and refrigerate for 10–15 minutes to help them hold their shape during cooking.
- Whisk together sour cream (or Greek yogurt), dill, lemon juice, and garlic powder, then season with salt and pepper to taste.
- Cover and refrigerate the sauce while you cook the salmon cakes.
- Heat 2 tablespoons olive oil in a large non-stick skillet over medium heat until the oil shimmers.
- Add salmon cakes in a single layer and cook 3–4 minutes on the first side without touching them until a deep golden-brown crust forms.
- Flip carefully and cook another 3–4 minutes until the second side is deep golden-brown.
- Transfer cakes to a plate lined with paper towels, adding more olive oil to the pan if needed for the second batch.
- Serve hot with the dipping sauce and a squeeze of lemon, and eat immediately for maximum crispiness.