
Red White & Blue Stained Glass Jello Shots
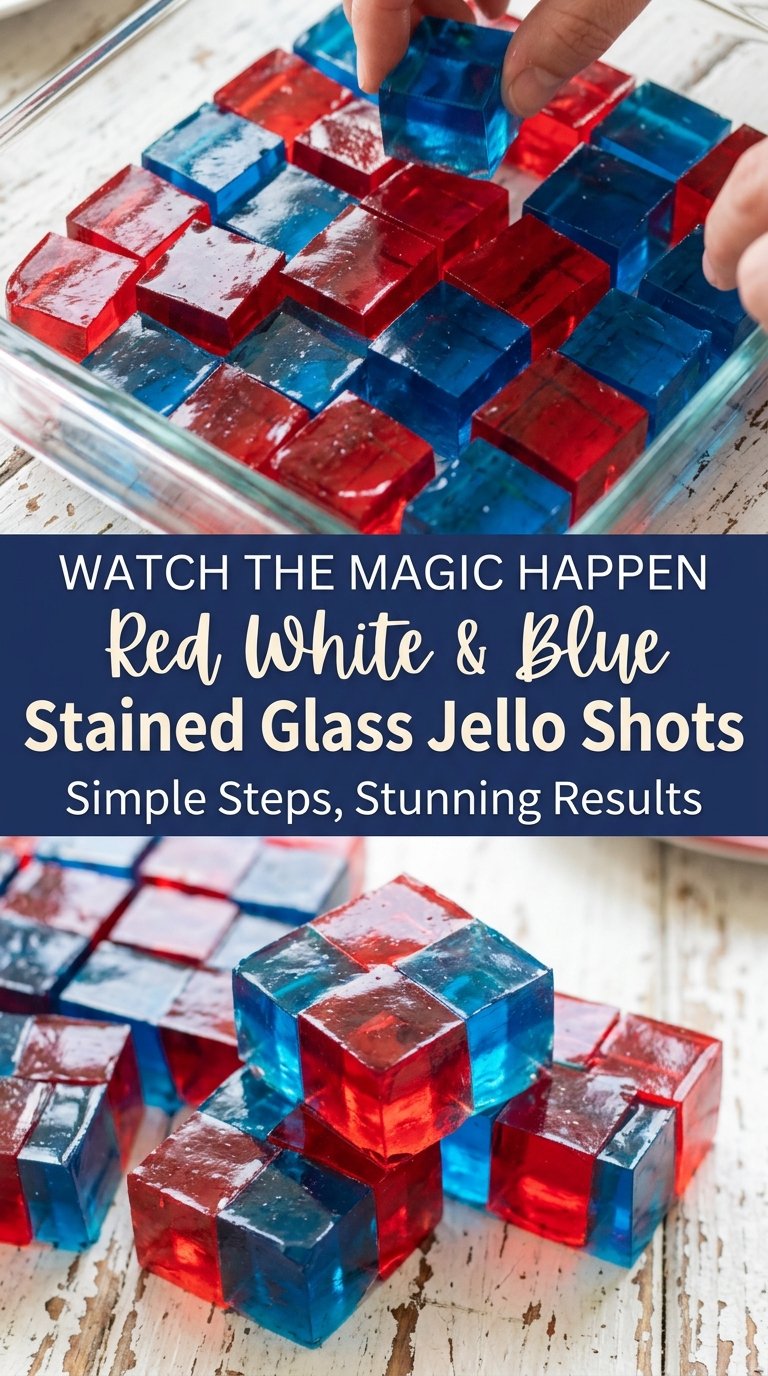
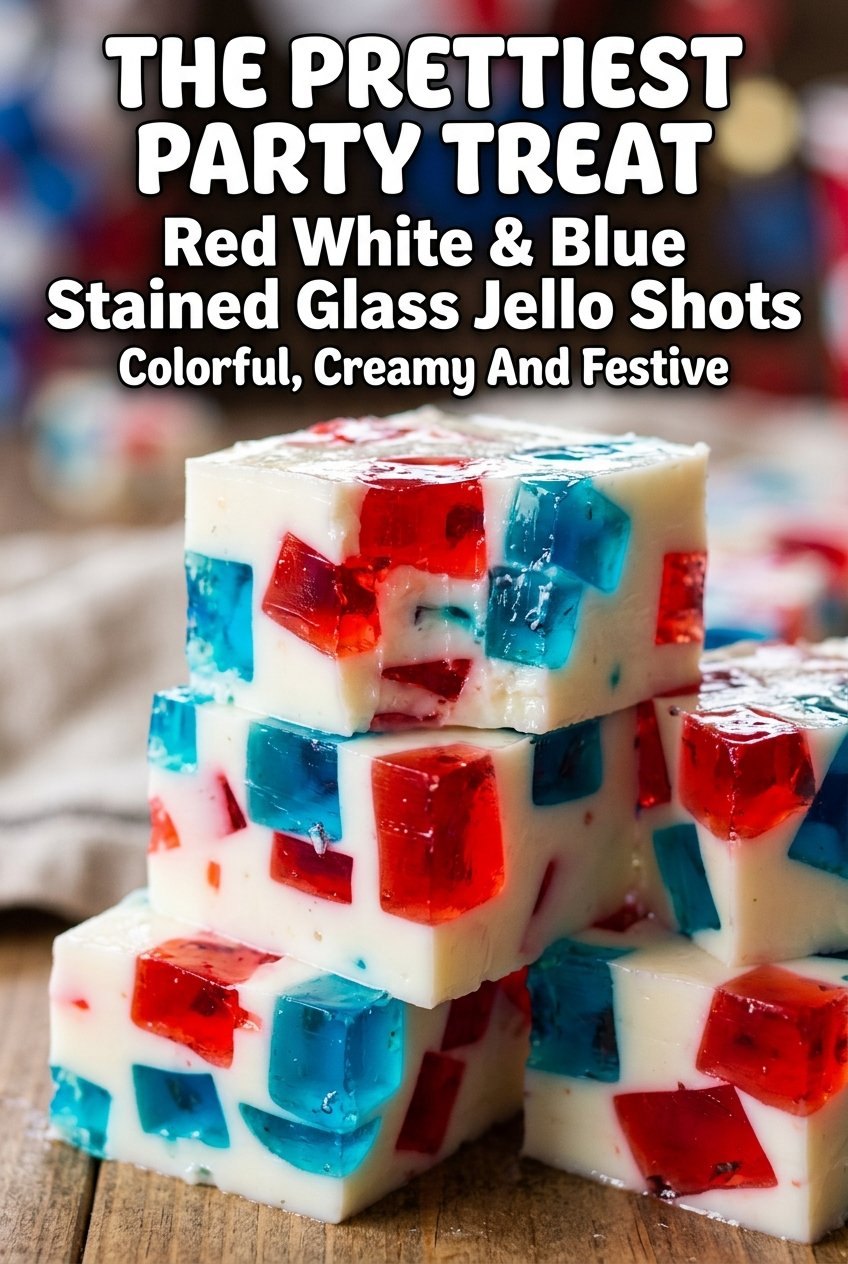
Red White & Blue Stained Glass Jello Shots set up with a clean, bouncy bite and a striking patriotic look that holds its shape on the plate. The colored gelatin…
Tip: save now, read later.
Red White & Blue Stained Glass Jello Shots set up with a clean, bouncy bite and a striking patriotic look that holds its shape on the plate. The colored gelatin cubes stay distinct inside the creamy vanilla base, so every square gives you a little burst of cherry and berry blue instead of turning into one muddy layer. They look festive, but the real win is the texture: firm cubes suspended in a soft, milky set that slices neatly and serves without slumping.
The trick is letting both the red and blue gelatin firm up all the way before you cut them. If they’re even a little soft, the cubes smear into the cream layer and you lose the stained-glass effect. The creamy base also needs enough time to cool slightly before pouring, because hot liquid can start melting the cubes at the edges and blur the color lines you worked for.
Below, I’ve included the timing details that keep the layers sharp, plus a few ways to adjust the texture if you want a firmer square or a softer, more spoonable set.
The cubes held their shape perfectly and the creamy layer set up smooth, not rubbery. I made them the night before a cookout and they sliced into clean little squares that looked great on the platter.
Stained Glass Jello Shots like these need a night in the fridge to set up into clean, colorful squares that slice without smearing.
The Reason the Colors Stay Sharp Instead of Turning Pink
The whole look depends on keeping the colored gelatin and the creamy base at different stages of set. If you pour the milk mixture while it’s still hot, the edges of the cubes start to melt and the colors bleed. If you wait too long and let the cream mixture thicken too much, it won’t flow around the cubes cleanly and you’ll get gaps instead of a smooth stained-glass finish.
Patience matters more here than speed. The red and blue gelatin need to be firm enough to cut into neat cubes with clean edges, and the cream base should be cool but still liquid when it goes in. That balance is what gives you the sharp color blocks inside each square.
What Each Ingredient Is Doing in the Pan
- Berry blue gelatin and cherry gelatin — These give you the stained-glass color contrast. Standard boxed gelatin works best because it sets firmly and cuts into clean cubes; sugar-free versions can work, but they sometimes set a little more brittle. Keep the flavors bright and simple so the creamy layer doesn’t compete with them.
- Unflavored gelatin — This is what makes the creamy layer set firmly enough to hold the cubes in suspension. There isn’t a true substitute if you want that sliceable finish. Bloom it in cold water first so it dissolves evenly and doesn’t leave grainy bits in the base.
- Sweetened condensed milk — It gives the base its opaque, milky look and a soft sweetness that balances the tart fruit gelatin. Evaporated milk won’t give the same richness or opacity, so the finished squares won’t look quite the same. Stir it in after the gelatin is fully dissolved so the mixture stays smooth.
- Boiling water — Hot enough water matters here because both the colored gelatin and the unflavored gelatin need to fully dissolve. If the water is only warm, you can end up with tiny undissolved granules that weaken the set. Use a full boil and stir until the liquid is completely clear.
Building the Layers Without Losing the Stained-Glass Effect
Set the Colored Gelatin Completely
Dissolve each box of gelatin in its own cup of boiling water and pour it into a shallow dish so it firms up evenly. A shallow pan sets faster and gives you neat cubes later. Chill it until it’s firm all the way through, not just wobbly around the edges. If the center still gives when you press it, the cubes will collapse when you cut them.
Bloom the Base Before You Add Heat
Sprinkle the unflavored gelatin over cold water and let it sit for a full 5 minutes. That bloom stage is what keeps the final texture smooth instead of grainy. Once the gelatin has absorbed the water, add the boiling water and stir until every speck has dissolved. If you see little translucent grains clinging to the spoon, keep stirring before you move on.
Pour When the Cream Is Cool Enough to Protect the Cubes
Stir in the sweetened condensed milk, then let the mixture cool briefly so it’s warm, not hot. Hot enough to stay liquid, cool enough not to melt the cubes. Cut the red and blue gelatin into small, even pieces and gently fold them together in a 9×13-inch dish. Pour the creamy mixture slowly over the top so it slips around the cubes instead of knocking them apart.
Chill Until the Slices Hold Their Shape
Refrigerate the dish until the cream layer is fully set, usually 4 to 6 hours. If you cut too early, the cubes drift and the squares slump. A fully set pan slices cleanly with a sharp knife, especially if you wipe the blade between cuts. Serve them chilled so the texture stays firm and the colors stay bright.
Three Ways to Change the Texture Without Losing the Look
Firmer Squares for Clean Serving
Let the finished pan chill a little longer than the recipe minimum so the cream layer feels fully set in the center, not just along the edges. That extra time gives you cleaner cuts and helps the cubes stay suspended instead of shifting when you slice. It’s the better choice if you’re serving these on a platter outdoors or after a long buffet line.
A Dairy-Free Version That Still Sets
Swap the sweetened condensed milk for a thick, full-fat canned coconut milk and add a little extra sugar to taste if needed. The flavor shifts slightly toward coconut, and the base won’t taste as classic, but it still gives you that opaque white layer and a good set. Use a brand that separates less in the can so the mixture stays smooth.
Less Sweet, More Tangy
If you want the final squares a little less sweet, use one package of raspberry gelatin and one package of blueberry gelatin, then keep the cream layer exactly the same. The color contrast stays strong, but the fruit flavors read a little sharper and less candy-like. That swap works especially well when these are part of a dessert table with richer dishes.
Storage and Reheating
- Refrigerator: Store covered for up to 4 days. The cubes may soften slightly over time, but the flavor stays good.
- Freezer: Don’t freeze these. Gelatin changes texture after freezing and turns spongy when thawed.
- Reheating: No reheating needed. Serve straight from the refrigerator and keep them cold until the last minute so the layers hold their shape.
The Questions That Come Up Once the Gelatin Starts Setting
Red White & Blue Stained Glass Jello Shots
Ingredients
Equipment
Method
- Pour 1 cup boiling water over the berry blue gelatin and stir until fully dissolved. Visual cue: the mixture should look smooth with no dry powder.
- Pour the blue gelatin mixture into a small dish. Visual cue: it should form a shallow layer for even cubes.
- Repeat with the cherry gelatin using the remaining 1 cup boiling water and stir until fully dissolved. Visual cue: the red mixture turns uniform and glossy.
- Pour the cherry gelatin mixture into a separate small dish. Visual cue: keep the red layer similarly shallow for easy cutting.
- Refrigerate the blue and red gelatin until firm, about 4 hours. Visual cue: the surfaces should jiggle only slightly when nudged.
- Sprinkle the unflavored gelatin over the cold water in a bowl. Visual cue: it will look like a thick gel layer on top of the water.
- Let it stand for 5 minutes to bloom. Visual cue: the gelatin should hydrate and soften.
- Add 1½ cups boiling water and stir until dissolved. Visual cue: the mixture should become clear and completely smooth.
- Mix in the sweetened condensed milk until uniform. Visual cue: it should look creamy and evenly colored throughout.
- Cut the red and blue gelatin into small cubes. Visual cue: aim for similar size pieces so they suspend evenly.
- Gently combine the cubes in a 9×13-inch dish. Visual cue: cubes should be evenly distributed without crushing.
- Pour the creamy gelatin mixture over the cubes. Visual cue: the liquid should flow between cubes and cover them to the edges.
- Refrigerate for 4–6 hours until set and sliceable. Visual cue: the center should hold its shape when pressed lightly.
- Cut into squares and serve chilled. Visual cue: clean edges show the stained-glass cube layers.