Rose Gold Drip Cake
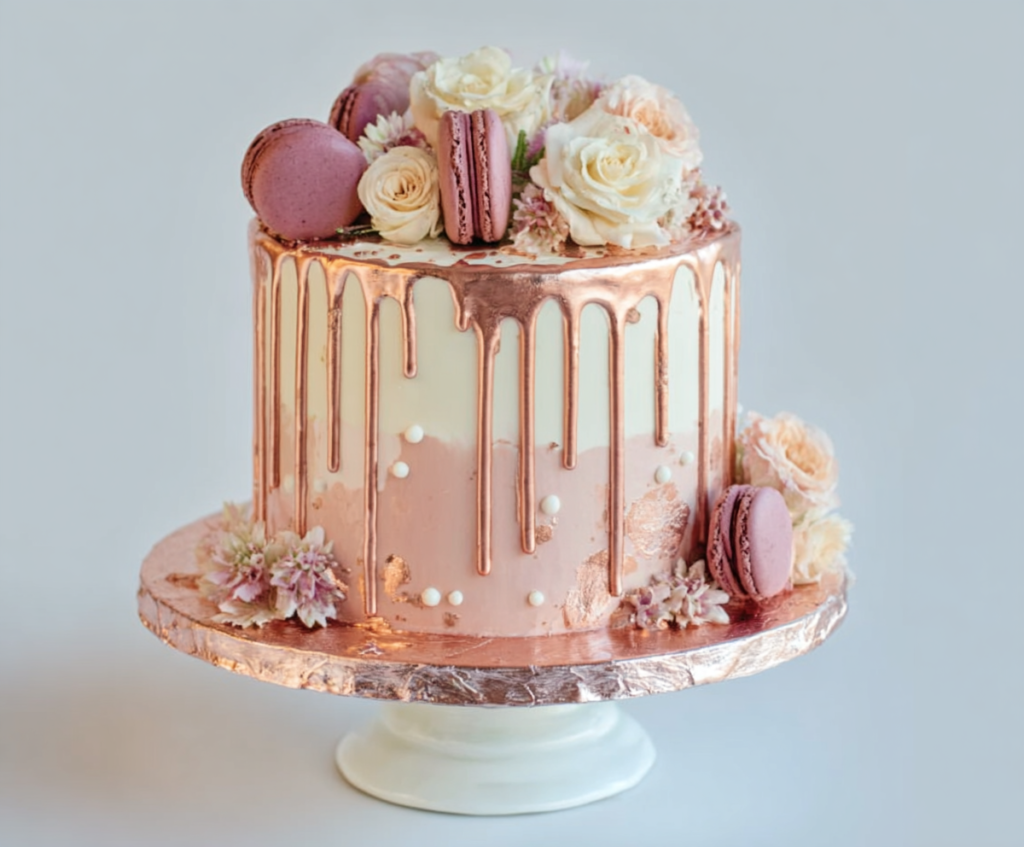
The Rose Gold Drip Cake is a lovely celebration dessert that's as beautiful as it is tasty. With its smooth buttercream finish and a shiny rose gold drip cascading down…
Tip: save now, read later.
The Rose Gold Drip Cake is a lovely celebration dessert that’s as beautiful as it is tasty. With its smooth buttercream finish and a shiny rose gold drip cascading down the sides, this cake seriously catches the eye. It usually features soft layers of vanilla or chocolate cake inside, making every bite a perfect balance of sweetness and style.
I love making this cake when I want to impress guests without spending all day in the kitchen. The rose gold drip adds a nice touch of glam that feels fancy but is surprisingly simple to create with the right frosting and a little patience. It’s so fun to watch the drizzle slowly flow down the sides as you decorate, like the cake is putting on its party dress.
When serving this cake, I like to keep things simple with a few fresh flowers or edible glitter on top to complement the shimmer of the rose gold. It’s perfect for birthdays, bridal showers, or any time you want to make a special moment feel even sweeter. Every time I slice into this cake, I’m reminded how a little sparkle goes a long way in making dessert extra joyful.
Key Ingredients & Substitutions
All-Purpose Flour: This is your go-to for a tender cake with good structure. For a lighter crumb, try cake flour. If gluten-free is needed, a blend made for baking works, but watch texture.
Unsalted Butter: I always use unsalted to control salt level. It’s best softened to room temperature for smooth creaming with sugar, helping your cake get fluffy.
Buttercream Frosting: Using heavy cream or milk keeps your frosting creamy and easy to spread. I like heavy cream for richness, but milk works fine for lighter taste.
Pink Gel Food Coloring: Gel colors are great because they don’t thin out your frosting like liquid do. Add small amounts to reach a soft blush pink, so your ombré looks smooth.
White Chocolate & Rose Gold Luster Dust: White chocolate melts well for the drip, while rose gold luster dust adds beautiful shine. If you want a vegan option, try a dairy-free white chocolate.
Decorations: Fresh flowers bring natural beauty—just make sure they’re pesticide-free and safe for cakes. Macarons add elegance, but if unavailable, small meringues or edible flowers are great too.
How Can I Get a Smooth, Even Ombré Buttercream Finish?
A clean ombré effect takes patience and a steady hand. Here’s how I do it:
- Start with a crumb coat to seal crumbs and chill—this helps your final layers go on smooth.
- Prepare two frosting shades: pure white and softly tinted blush pink.
- Apply white frosting to the top third of the cake, pink to the bottom third.
- Use a bench scraper or angled spatula and gently blend where the two colors meet in the middle, smoothing in upward strokes.
- Chill briefly if needed, then do a final smoothing pass for a flawless finish.
Work quickly but gently. Keeping your frosting chilled between steps makes blending easier and cleaner.
Equipment You’ll Need
- Three 6-inch round cake pans – perfect size for layers and easy to handle evenly.
- Electric mixer (stand or hand) – makes creaming butter and beating frosting smooth and quick.
- Wire cooling racks – help cakes cool evenly and prevent soggy bottoms.
- Offset spatula – great for spreading frosting evenly and smoothing the ombré finish.
- Spoon or squeeze bottle – lets you control the rose gold drip with precision.
- Small paintbrush – ideal for applying edible luster dust details cleanly.
- Turntable (optional) – makes frosting and decorating the cake easier and more even.
Flavor Variations & Add-Ins
- Try almond extract instead of vanilla for a nutty twist that pairs well with rose gold tones.
- Mix fresh raspberries or strawberry puree into the batter for a fruity surprise inside each slice.
- Use cream cheese frosting for a tangy contrast to the sweet cake and metallic drip.
- Add edible rose petals or dried lavender into the frosting for subtle floral notes and extra texture.
Rose Gold Drip Cake
Ingredients You’ll Need:
Cake:
- 2 ½ cups all-purpose flour
- 2 ½ tsp baking powder
- ½ tsp salt
- 1 cup unsalted butter, softened
- 1 ¾ cups granulated sugar
- 4 large eggs
- 1 tsp vanilla extract
- 1 cup whole milk
Buttercream Frosting:
- 1 ½ cups unsalted butter, softened
- 5 cups powdered sugar, sifted
- 2 tsp vanilla extract
- 3-4 tbsp heavy cream or milk
- Pink gel food coloring (for a soft blush pink tone)
Rose Gold Drip:
- 4 oz white chocolate, chopped
- ¼ cup heavy cream
- Edible rose gold luster dust
- 1-2 tsp edible gold or rose gold pearl dust mixed with a little clear alcohol (vodka or lemon extract) or white food-grade glycerin to paint metallic splash
Decorations:
- Purple/lavender macarons (about 4-6)
- Fresh roses (cream, soft peach, or ivory colors), safe for cake decoration
- Small edible flowers or flower buds
- White sugar pearls or edible pearls
How Much Time Will You Need?
This cake takes about 1 hour for preparation and baking, plus 30 minutes chilling time for the crumb coat, and extra chilling after decorating to set everything. Plan on about 2.5 to 3 hours total, including cooling times, to get the best results.
Step-by-Step Instructions:
1. Bake the Cake Layers:
Preheat your oven to 350°F (175°C). Grease and flour three 6-inch round cake pans. In a medium bowl, whisk together the flour, baking powder, and salt. In a large bowl, cream the softened butter and sugar until light and fluffy. Add the eggs one at a time, beating well after each addition, then stir in the vanilla extract. Alternately add the flour mixture and milk to the wet ingredients, starting and ending with the flour, mixing until just combined. Divide the batter evenly into the pans, smooth the tops, and bake for 25-30 minutes until a toothpick comes out clean. Let the cakes cool in the pans for 10 minutes, then turn them out onto wire racks to cool completely.
2. Prepare the Buttercream Frosting:
In a large bowl, beat the softened butter on medium speed until creamy. Gradually add the powdered sugar, about one cup at a time, alternating with splashes of milk (or heavy cream) and vanilla extract. Increase the mixer speed and beat until the frosting is fluffy and easy to spread. Add pink gel food coloring a little at a time until you reach a soft blush pink color.
3. Assemble and Frost the Cake:
If needed, level the cooled cake layers for an even stack. Place the first layer on your cake board or serving plate and spread a layer of buttercream over the top. Repeat with the remaining layers. Then, apply a thin crumb coat all around the cake and chill it in the fridge for 30 minutes. For the final coat, blend white and the blush pink frosting to create a gentle ombré effect—white on the top fading into the pink at the base. Spread and smooth this coat carefully.
4. Make the Rose Gold Drip:
Heat the heavy cream in a small saucepan over medium heat until it just begins to simmer. Pour it over the chopped white chocolate and let it sit for 1 minute. Stir gently until the chocolate is fully melted and the mixture is smooth. Let this ganache cool until it’s thick but still pourable. Mix in the rose gold luster dust thoroughly to add a shiny metallic finish. Using a spoon or squeeze bottle, carefully drip the ganache around the edges of the cake, letting it drip down the sides naturally. Chill briefly to set the drip.
5. Add the Rose Gold Foil & Decorations:
With a small brush, paint edible gold or rose gold pearl dust onto the sides of the cake to add sparkle and metallic accents. Arrange the fresh roses and small edible flowers on top of the cake and around the base for a natural, elegant look. Place the lavender macarons neatly among the flowers on top and along the sides. Add white sugar pearls thoughtfully on the cake surface for delicate texture and detail.
6. Final Touches:
Chill the finished cake to fully set the frosting and drip. When ready to serve, bring the cake to room temperature for the best flavor and softness.
Can I Use Frozen Cake Layers for This Recipe?
Yes, you can bake the cake layers ahead and freeze them. Make sure they are fully cooled before wrapping tightly in plastic wrap and foil. Thaw in the fridge overnight before assembling and frosting for best results.
What Can I Substitute for Rose Gold Luster Dust?
If you don’t have edible rose gold luster dust, you can use edible gold or copper dust for a similar metallic effect, or shimmer dust in pink tones. Just make sure it’s labeled safe for food use.
How Should I Store the Finished Cake?
Store the decorated cake in the fridge in an airtight container to keep the frosting fresh and protect the delicate decorations. Bring it to room temperature about 30 minutes before serving for the best flavor and texture.
Can I Make This Cake Dairy-Free?
Absolutely! Swap the butter for a dairy-free margarine or coconut oil, use a plant-based milk like almond or oat milk, and choose a dairy-free white chocolate option for the drip. The texture and flavor will be slightly different but still delicious.