

Candy Cane Bark
The candy canes make a dry little crackle when you press them into the white chocolate, and that’s the moment this bark starts to look like itself. Candy Cane Bark…
Tip: save now, read later.
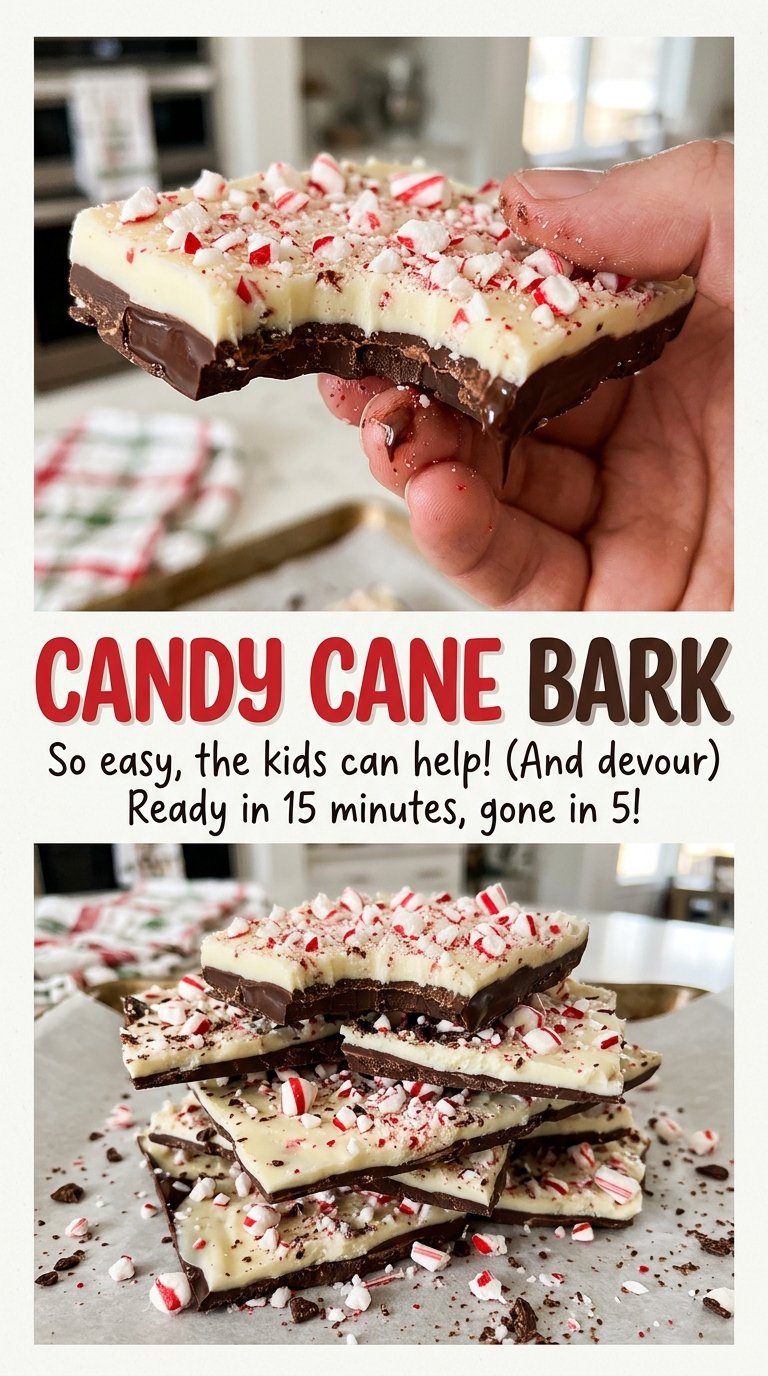
The candy canes make a dry little crackle when you press them into the white chocolate, and that’s the moment this bark starts to look like itself. Candy Cane Bark has two smooth chocolate layers under a crisp peppermint topping, so every piece has a little snap and crunch.
I keep the semisweet layer underneath because its deeper cocoa flavor balances the sweetness of the white chocolate and candy canes. Finely chopped chocolate melts smoothly over gentle heat, which makes it easier to spread into an even base without scorching the edges.
Once the bark is fully firm, a short rest at room temperature makes it easier to break into pieces. The finished shards look festive, but they’re just as good when the pieces are uneven, with candy cane bits scattered across every bite.

Kitchen Note
Sprinkle the crushed candy canes on as soon as the white chocolate is spread, then press them in gently. If you wait until the top starts to set, the pieces won’t settle into the chocolate as neatly.
Save this Candy Cane Bark for a crisp peppermint topping and two clean chocolate layers that break into festive, shareable pieces.
Why the Dark Chocolate Should Be Just Set, Not Fully Hard
The two layers need different temperatures at the same time: the dark chocolate should hold its shape, while the white chocolate still needs to spread smoothly across it. Chill the dark layer for 10 to 15 minutes, stopping when it’s just set. That gives it enough structure to support the next layer without turning it into a cold, rigid slab.
If the bottom layer has become very firm, the white chocolate is more likely to sit on top instead of settling against it. That can leave you with two distinct sheets that separate when you break the bark. The short chill is there to set the surface, not to finish chilling the whole pan. Keep an eye on the chocolate rather than leaving it in the refrigerator while you move on to another task.
The white chocolate also needs a brief pause after melting. Letting it stand for 2 minutes off the heat takes the edge off its warmth before it goes over the dark layer. You’ll have a smoother time spreading it, and the dark base is less likely to soften under the warm topping.
What the Three Ingredients Bring to Each Layer
- Semisweet chocolate — This forms the more cocoa-forward bottom layer and keeps the overall sweetness in check. Finely chopped chocolate melts more evenly than large chunks; a good baking bar is a dependable choice, but you don’t need an expensive specialty chocolate for bark. Milk chocolate can replace it if you prefer a sweeter, softer-tasting contrast, though the finished bark won’t have the same bittersweet balance.
- White chocolate — Choose actual white chocolate with cocoa butter for a smooth, creamy layer. Its sweetness is part of the contrast with the semisweet base, so white baking chips aren’t always a perfect swap; some melt thicker and can be harder to spread evenly. Chop it finely, just as you do the dark chocolate.
- Candy canes — These give the bark its peppermint crunch and the little red-and-white flecks across the top. Crush them to a mix of small pieces and fine crumbs so the topping spreads across the chocolate instead of collecting in just a few big clusters. The candy canes don’t need special handling, but keep the pieces dry until they go onto the bark.
From a Smooth Chocolate Base to a Crisp Peppermint Finish
Line the Pan Before You Melt Anything
Line a 9×13-inch baking pan with parchment paper, leaving overhang on two sides. Those edges give you something to hold when you want to lift the firm bark from the pan. Set the pan nearby before melting the chocolate; once the dark chocolate is smooth, it’s easiest to spread while it’s still warm.
Melt the Semisweet Chocolate Gently
Bring 1 inch of water to a gentle simmer over medium-low heat in a 2-quart saucepan. Set a medium heatproof bowl over the pan without letting the bowl touch the water, add the finely chopped semisweet chocolate, and stir until smooth, about 3 to 5 minutes. Keep the water at a gentle simmer rather than a hard boil. If any water gets into the chocolate, it can turn thick and grainy instead of glossy.
Give the Bottom Layer a Short Chill
Spread the melted semisweet chocolate evenly in the prepared pan, working it into a level layer. Chill it for 10 to 15 minutes, until just set. The surface should hold its shape when you add the white chocolate, but it doesn’t need to be fully firm. A quick look before you melt the second layer helps you avoid leaving the base in the refrigerator too long.
Layer, Top, and Let the Bark Firm Up
Bring the water back to a gentle simmer if needed, then melt the finely chopped white chocolate in a second medium heatproof bowl over the saucepan, again keeping the bowl above—not in—the water. Stir until smooth, 3 to 5 minutes, remove it from the heat, and let it stand for 2 minutes. Spread it evenly over the dark layer, immediately scatter on the crushed candy canes, and press them in gently. Chill the pan for 30 to 45 minutes until fully firm, then let it stand at room temperature for 5 minutes before breaking the bark into pieces.
Two Easy Ways to Change the Crunch and Shape
A Finer, More Even Peppermint Top
Crush the candy canes into smaller pieces with more fine crumbs mixed in. The peppermint flavor and color spread across the surface more evenly, and each bite gets a lighter crunch rather than a few large, hard pieces.
Chunkier Shards for a Bigger Snap
Leave more of the crushed candy canes in noticeable pieces and break the firm bark into larger shards. You’ll get a more pronounced peppermint crunch and pieces that look irregular and handmade; keep the topping pressed gently into the white chocolate so it stays attached.
Storage and Reheating
- Refrigerator: Keep the bark in an airtight container for up to 2 weeks. The candy cane topping may soften a little from moisture in the refrigerator.
- Freezer: Freeze it in an airtight container with parchment between layers for up to 2 months. Thaw it while still sealed so condensation forms on the container, not on the candy.
- Reheating: Reheating isn’t needed. Let the bark stay cool and firm; warming it can soften the chocolate and loosen the peppermint topping.
Questions That Come Up While Making Candy Cane Bark
Candy Cane Bark
Ingredients
Equipment
Method
- Line a 9x13-inch baking pan with parchment paper, leaving overhang on two sides.
- Bring 1 inch of water to a gentle simmer over medium-low heat in a 2-quart saucepan.
- Set a medium heatproof bowl over the pan without letting it touch the water, add the semisweet chocolate, and stir until smooth, 3 to 5 minutes.
- Spread the melted chocolate evenly in the prepared pan.
- Chill for 10 to 15 minutes, until just set.
- Bring the water in the saucepan back to a gentle simmer if needed.
- Set a second medium heatproof bowl over the pan without letting it touch the water, add the white chocolate, and stir until smooth, 3 to 5 minutes.
- Remove from the heat and let stand for 2 minutes.
- Spread the white chocolate evenly over the dark chocolate layer.
- Immediately sprinkle the crushed candy canes over the top and press them in gently.
- Chill for 30 to 45 minutes, until fully firm.
- Let stand at room temperature for 5 minutes.
- Break into pieces.
